> ## Documentation Index
> Fetch the complete documentation index at: https://docs.shortext.ny-corp.io/llms.txt
> Use this file to discover all available pages before exploring further.
# Tools Configuration & Testing
> Learn how to connect, configure, and test APIs within your Shortext agents to extend their capabilities.
Shortext Agents can interact with external systems through APIs — allowing them to fetch data, trigger workflows, or update other applications automatically.
This section explains how to configure and test these API integrations step by step.
***
## 🔧 Step 1 — Access the API Settings
From your **Agent Configuration** page, open the **“Tools”** tab.
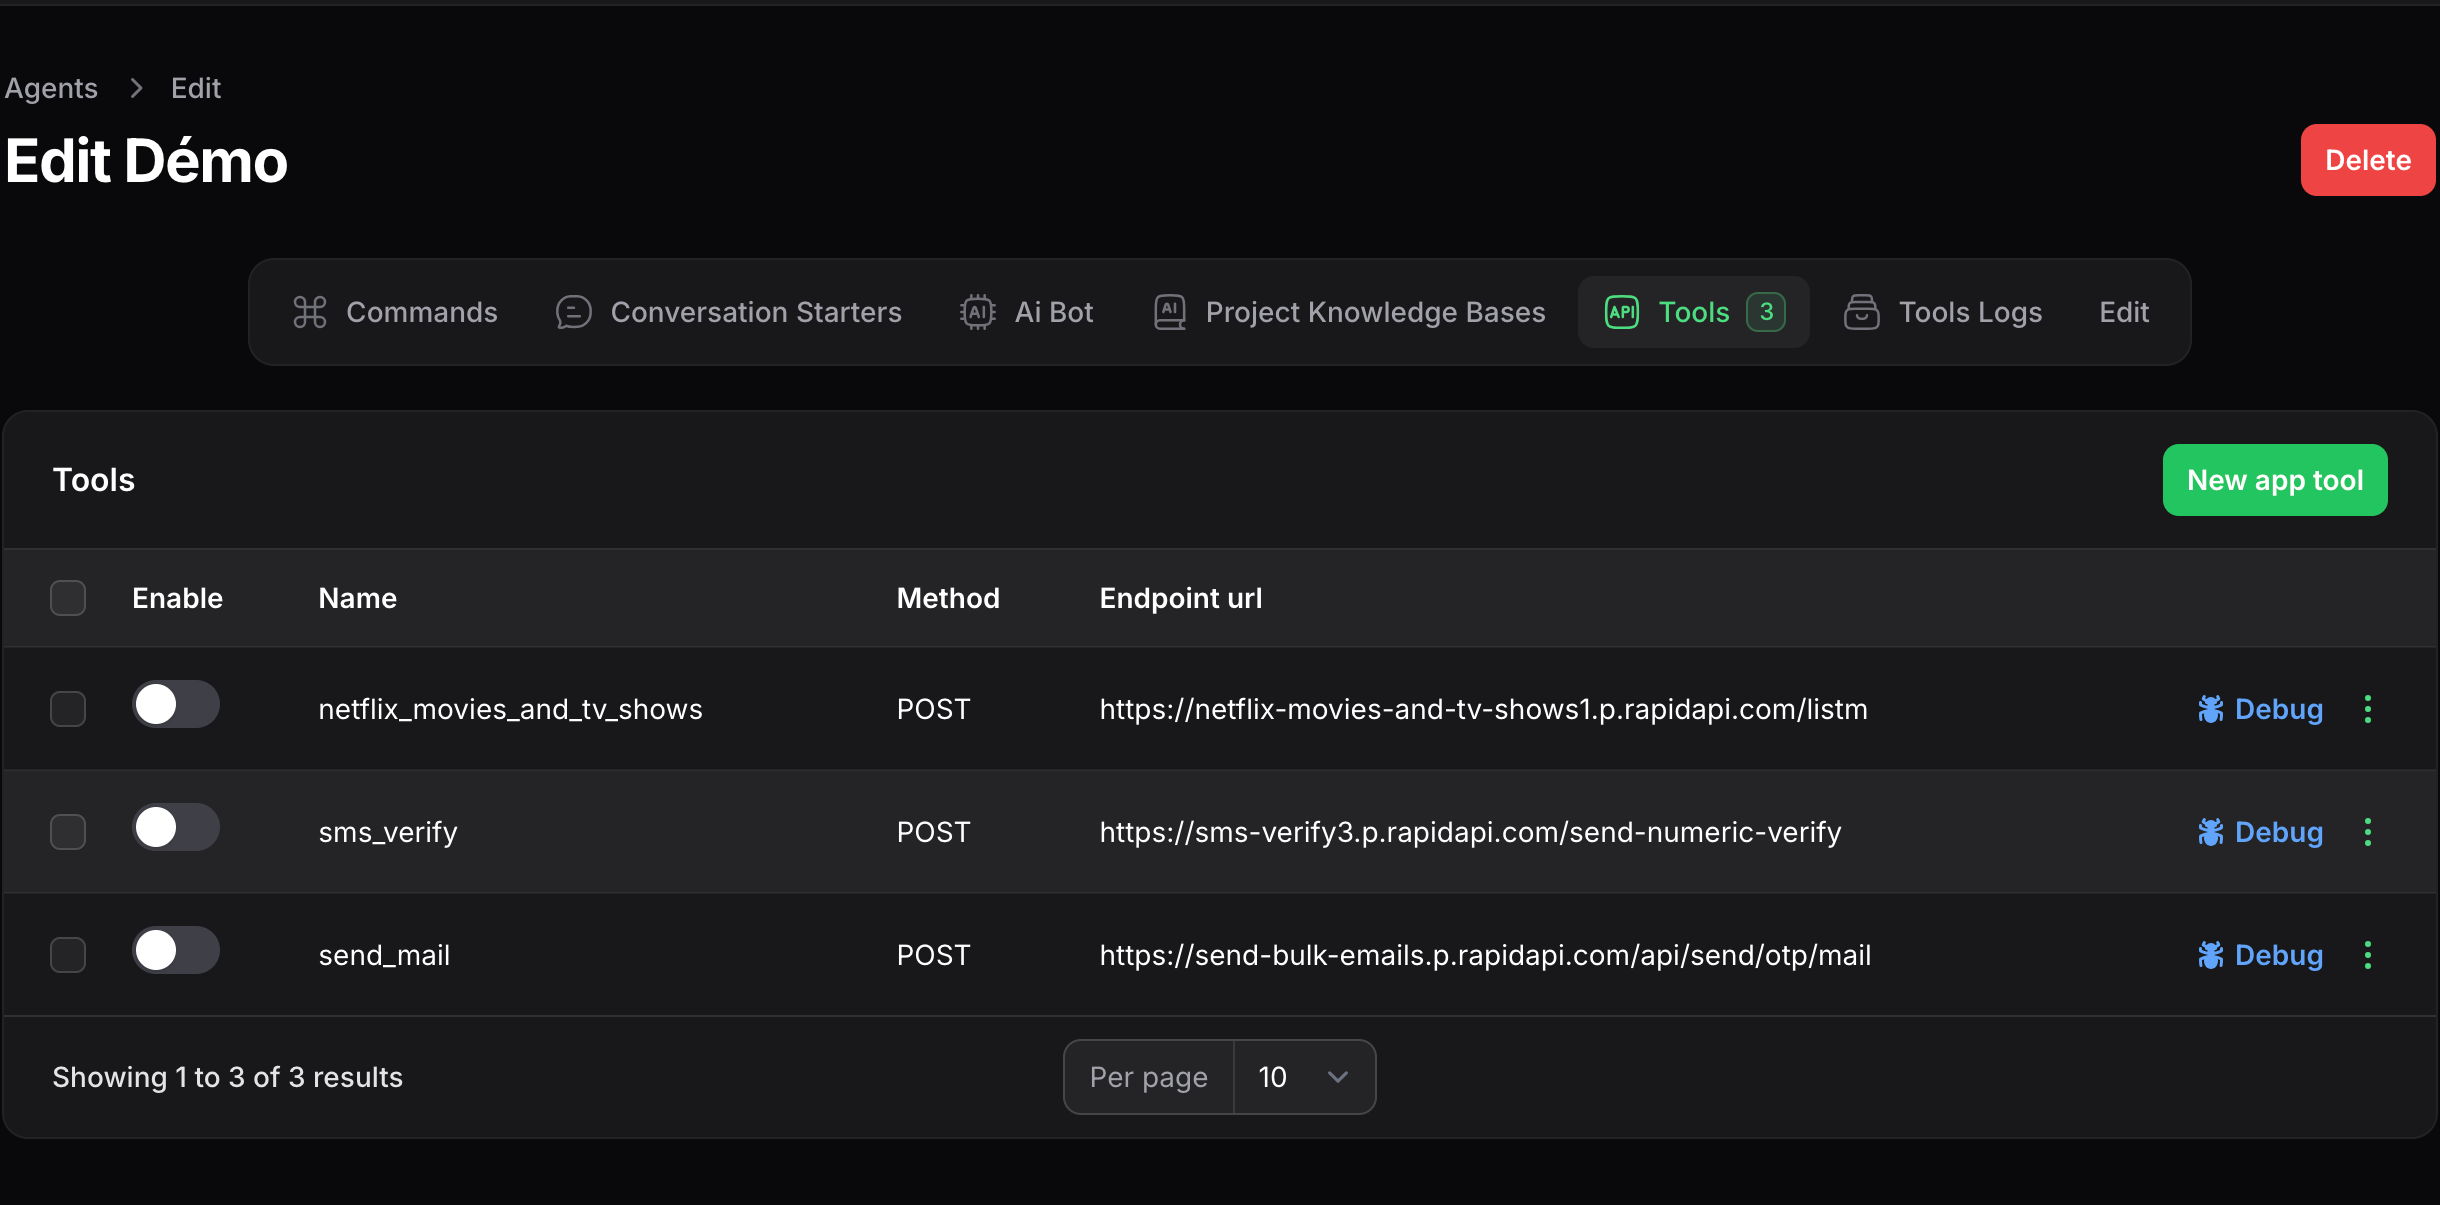 Each agent can have one or more API connections depending on your workflow.
***
## 🧩 Step 2 — Add a New Tool
Click **“New Tool”** to define a new connection.
Each agent can have one or more API connections depending on your workflow.
***
## 🧩 Step 2 — Add a New Tool
Click **“New Tool”** to define a new connection.
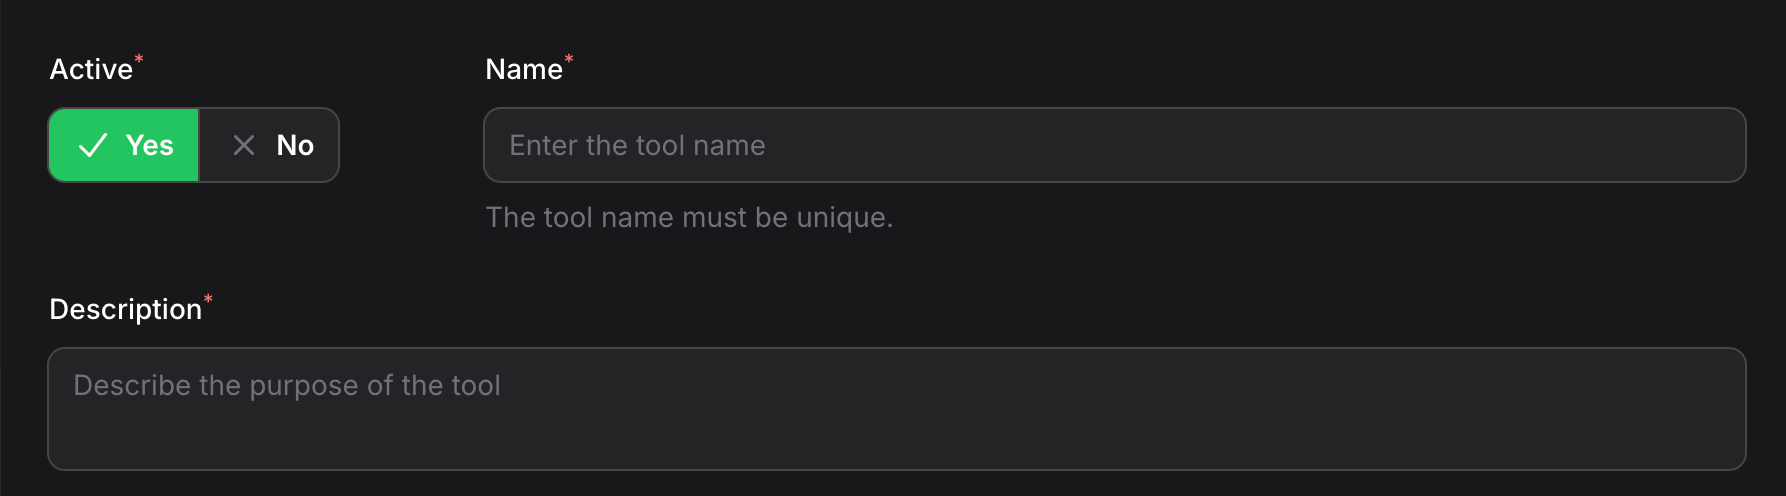 You’ll need to provide:
* **Name** — a friendly *unique* name in camelcase (e.g., `payment_confirmation` or `get_orders`)
* **State** — if the tool can be use or not by the agent (e.g `disable when the api is under maintenance`)
* **Description** — note about what the API does to allow agent to understand when to use it
Example of description:
```md theme={null}
This API provides data on the movies and TV shows available on Netflix, a popular streaming service.
```
***
## ⚙️ Step 3 — Define Endpoint and headers
Set the **endpoints** that will be used to consume your service and the required **headers** such as token, api key.
You’ll need to provide:
* **Name** — a friendly *unique* name in camelcase (e.g., `payment_confirmation` or `get_orders`)
* **State** — if the tool can be use or not by the agent (e.g `disable when the api is under maintenance`)
* **Description** — note about what the API does to allow agent to understand when to use it
Example of description:
```md theme={null}
This API provides data on the movies and TV shows available on Netflix, a popular streaming service.
```
***
## ⚙️ Step 3 — Define Endpoint and headers
Set the **endpoints** that will be used to consume your service and the required **headers** such as token, api key.
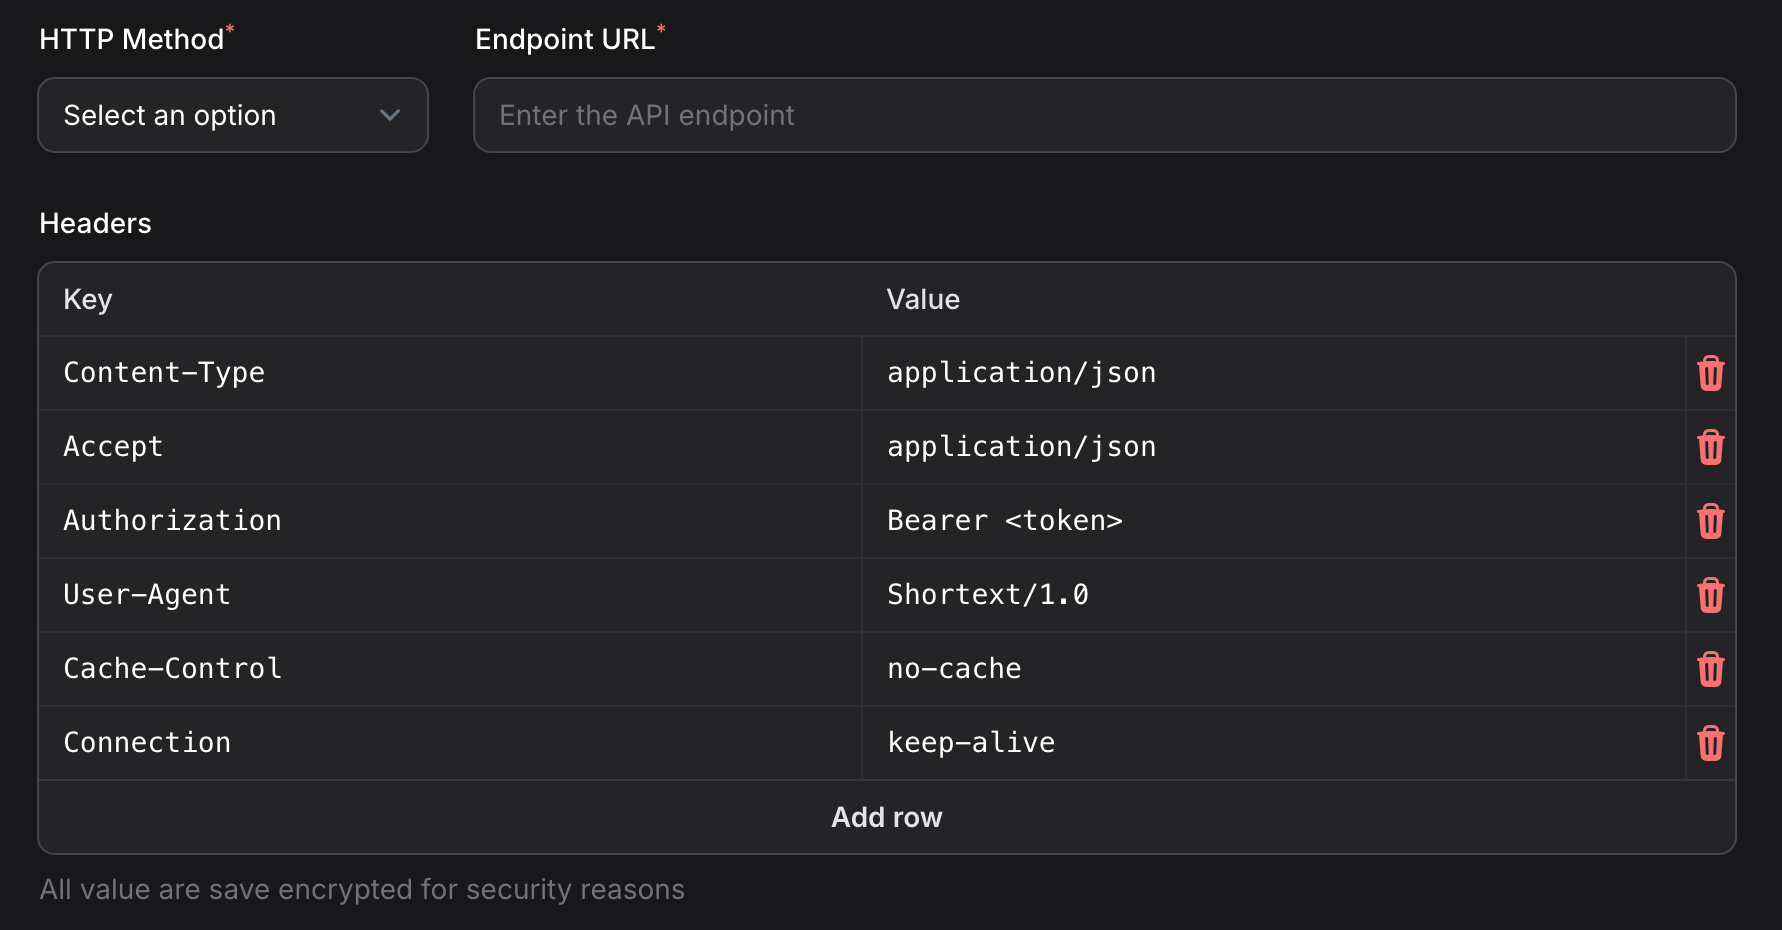 Sensitive data such as tokens or API keys are encrypted and stored securely.
Each endpoint includes:
* **Method** — `GET`, `POST`, `PUT`, `DELETE`, etc.
* **Url** — the full URL of your service (e.g., `https://acme.com/users/{id}`)
* **Headers** — optional (for content type, authentication)
You can use **variables** like `{phone}` or `{email}` in your paths.
These will be replaced dynamically from the user’s conversation context.
***
## ⚙️ Step 3 — Define Request Body
**Request Body** — JSON or form data (for POST/PUT requests)
Sensitive data such as tokens or API keys are encrypted and stored securely.
Each endpoint includes:
* **Method** — `GET`, `POST`, `PUT`, `DELETE`, etc.
* **Url** — the full URL of your service (e.g., `https://acme.com/users/{id}`)
* **Headers** — optional (for content type, authentication)
You can use **variables** like `{phone}` or `{email}` in your paths.
These will be replaced dynamically from the user’s conversation context.
***
## ⚙️ Step 3 — Define Request Body
**Request Body** — JSON or form data (for POST/PUT requests)
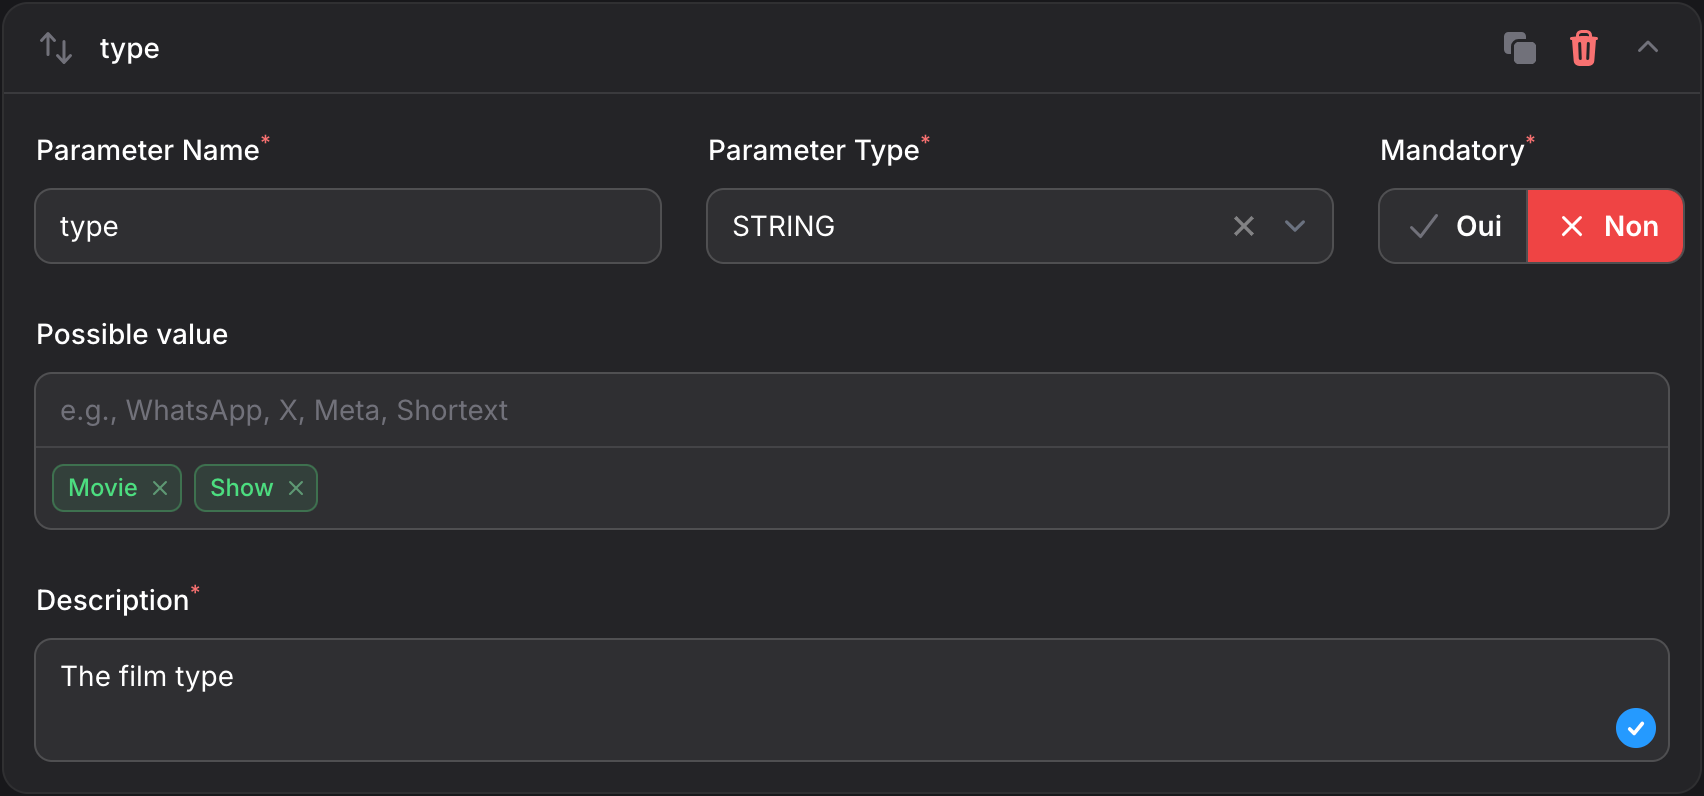 Each parameter includes:
* **Name** — a friendly *unique* name (e.g., `order_id` or `id`).
* **Type** — the parameter type `STRING`, `INTEGER`, `BOOLEAN`. in case of `STRING`: possible values can be defined
* **Mandatory** — if it should be set always present or not
* **Description** — note about what the parameter does to allow agent to understand how to fill it
**Response Mapping** — always return response that has a clear meaning in JSON or plain text
Example:
```json theme={null}
{
"success": true,
"message": "The balance has been refresh successfully",
"body": {
"balance": {
"amount": 634.1987,
"currency": "EUR"
},
"local_balance": {
"amount": 416618.8856,
"currency": "XAF"
}
}
}
```
***
## 🧠 Step 4 — Usage of the API Inside an Agent
Once your API is configured and enabled, you can make it **callable** from your agent’s workflow or rules.
Each parameter includes:
* **Name** — a friendly *unique* name (e.g., `order_id` or `id`).
* **Type** — the parameter type `STRING`, `INTEGER`, `BOOLEAN`. in case of `STRING`: possible values can be defined
* **Mandatory** — if it should be set always present or not
* **Description** — note about what the parameter does to allow agent to understand how to fill it
**Response Mapping** — always return response that has a clear meaning in JSON or plain text
Example:
```json theme={null}
{
"success": true,
"message": "The balance has been refresh successfully",
"body": {
"balance": {
"amount": 634.1987,
"currency": "EUR"
},
"local_balance": {
"amount": 416618.8856,
"currency": "XAF"
}
}
}
```
***
## 🧠 Step 4 — Usage of the API Inside an Agent
Once your API is configured and enabled, you can make it **callable** from your agent’s workflow or rules.
 Example:
When a user says *“Check my application status”*, your agent can call:
```json theme={null}
{
"action": "api.call",
"api": "RecruitmentService",
"endpoint": "application_status",
"params": {
"phone": "{{user.phone}}"
}
}
```
You can define conditions so that API calls are triggered only when specific user intents are detected.
***
## 🧪 Step 5 — Test the API Connection
Shortext provides a built-in **API Tester** so you can validate your setup before deploying it.
Example:
When a user says *“Check my application status”*, your agent can call:
```json theme={null}
{
"action": "api.call",
"api": "RecruitmentService",
"endpoint": "application_status",
"params": {
"phone": "{{user.phone}}"
}
}
```
You can define conditions so that API calls are triggered only when specific user intents are detected.
***
## 🧪 Step 5 — Test the API Connection
Shortext provides a built-in **API Tester** so you can validate your setup before deploying it.
 To test:
1. Click on **Debug** on the endpoint you configured.
2. Provide any **parameters or payload** required.
3. Click **“Run Test”**.
4. View the **response logs** and status code.
All test requests are logged for debugging. You can re-run tests as often as needed without affecting your live agents.
***
## 🧭 Step 6 — Monitor API Usage
After deployment, you can track how often your agents call APIs via the **API Usage Log**.
To test:
1. Click on **Debug** on the endpoint you configured.
2. Provide any **parameters or payload** required.
3. Click **“Run Test”**.
4. View the **response logs** and status code.
All test requests are logged for debugging. You can re-run tests as often as needed without affecting your live agents.
***
## 🧭 Step 6 — Monitor API Usage
After deployment, you can track how often your agents call APIs via the **API Usage Log**.
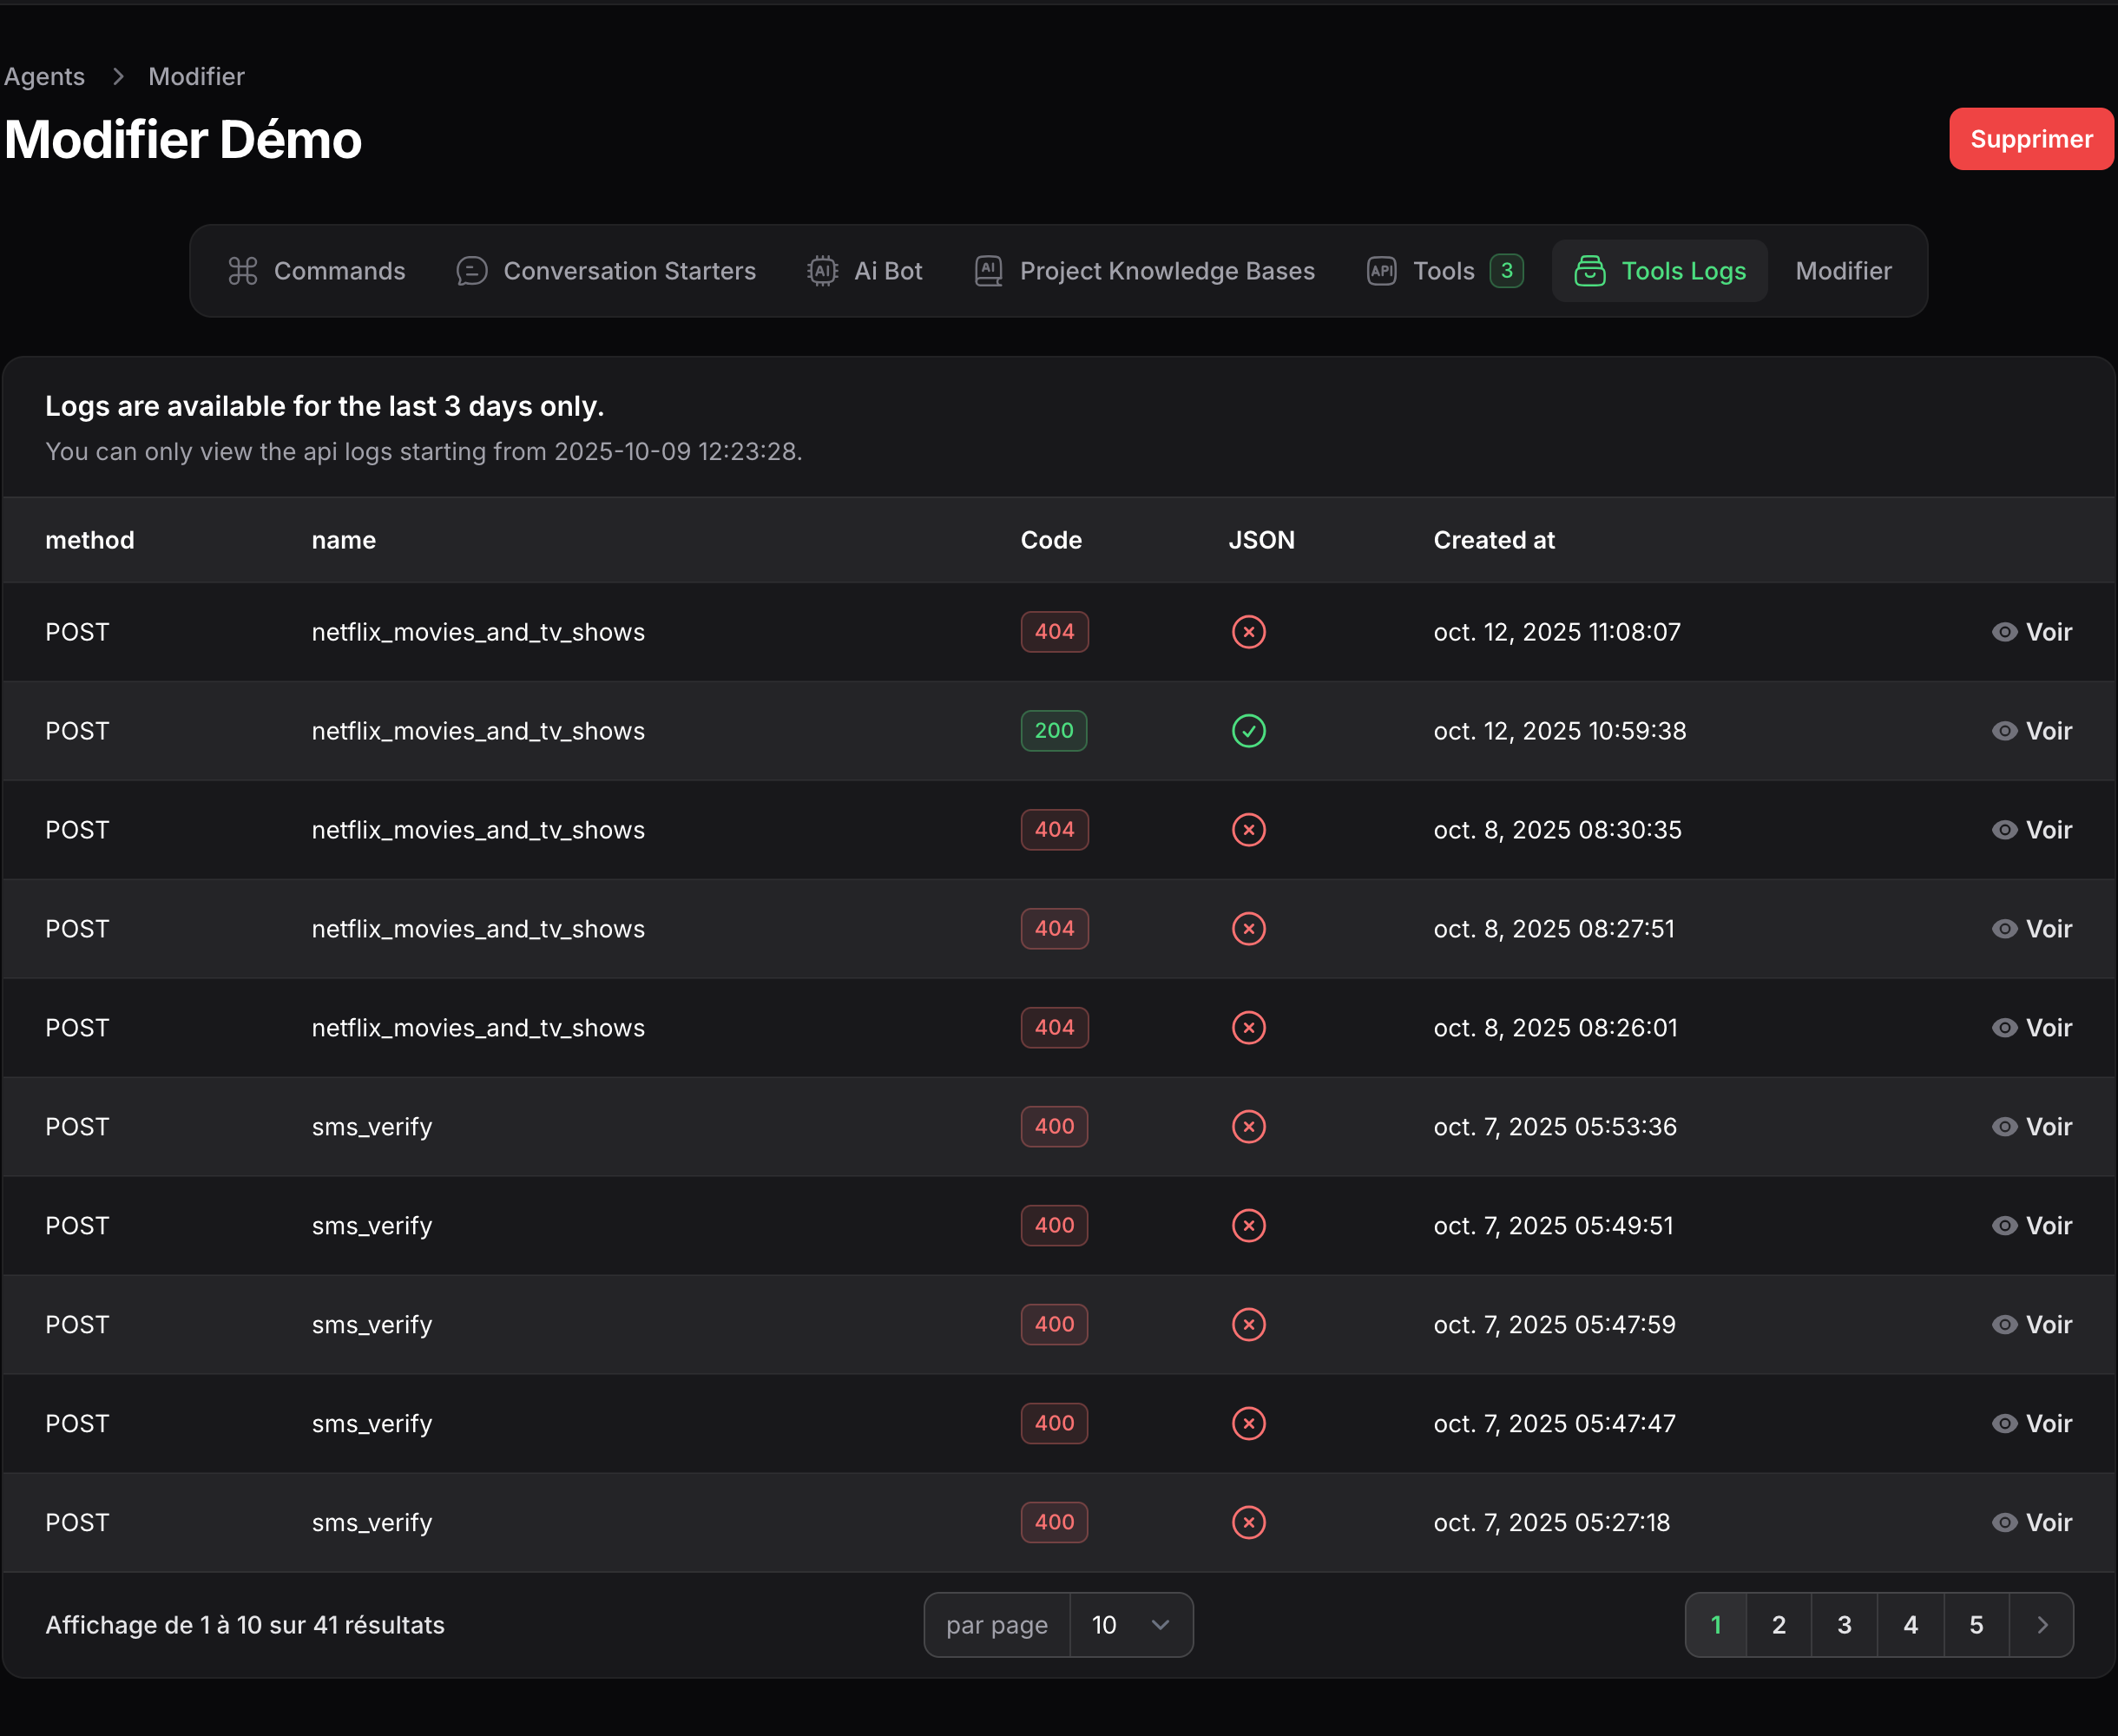 You’ll see:
* **Timestamps** of API calls
* **Response time and status**
* **Agent and user** who triggered the call
* **Error messages** (if any)
Frequent or failed API calls may impact performance. Monitor this section to ensure stability.
***
## 🧰 Example Use Cases
Here are a few examples of how API connections can enhance your agents:
| Use Case | Description | Example API |
| ------------------------ | ---------------------------------------- | ----------------------- |
| **CRM Lookup** | Fetch user info based on phone number | `GET /users/{phone}` |
| **Order Tracking** | Retrieve delivery updates | `GET /orders/{id}` |
| **Payment Confirmation** | Validate or trigger a transaction | `POST /payments/verify` |
| **Ticket Creation** | Send a complaint or issue to your system | `POST /tickets/create` |
***
## 🚀 Next Steps
Now that you’ve connected your APIs, you can:
* [Build Automations That Use API Data →](/automations/creating-automation)
* [Test Conversations with Live API Calls →](/agents/testing-conversation)
* [View API Analytics and Logs →](/api/logs)
***
Shortext APIs give your agents the power to act — not just respond.
With proper configuration, your bot can become a true workflow engine for your business.
You’ll see:
* **Timestamps** of API calls
* **Response time and status**
* **Agent and user** who triggered the call
* **Error messages** (if any)
Frequent or failed API calls may impact performance. Monitor this section to ensure stability.
***
## 🧰 Example Use Cases
Here are a few examples of how API connections can enhance your agents:
| Use Case | Description | Example API |
| ------------------------ | ---------------------------------------- | ----------------------- |
| **CRM Lookup** | Fetch user info based on phone number | `GET /users/{phone}` |
| **Order Tracking** | Retrieve delivery updates | `GET /orders/{id}` |
| **Payment Confirmation** | Validate or trigger a transaction | `POST /payments/verify` |
| **Ticket Creation** | Send a complaint or issue to your system | `POST /tickets/create` |
***
## 🚀 Next Steps
Now that you’ve connected your APIs, you can:
* [Build Automations That Use API Data →](/automations/creating-automation)
* [Test Conversations with Live API Calls →](/agents/testing-conversation)
* [View API Analytics and Logs →](/api/logs)
***
Shortext APIs give your agents the power to act — not just respond.
With proper configuration, your bot can become a true workflow engine for your business.